What is CUDA and Triton?
CUDA (Compute Unified Device Architecture) was introduced by NVIDIA to allow developers like us to directly program the GPUs. CUDA provides a low level C/C++ API for writing programs that execute on the GPU. We wrap the code to be executed on the GPU inside a function, this function is called a kernel.
Not every machine learning person is an expert in using low-level programming languages supported by CUDA. This is where OpenAI’s Triton comes into play. To give you a glimpse of what Triton stands for, here is an extract from their official release note:
We’re releasing Triton 1.0, an open-source Python-like programming language which enables researchers with no CUDA experience to write highly efficient GPU code—most of the time on par with what an expert would be able to produce.
The code we write in low-level CUDA and Triton are both compiled to PTX (Parallel Thread eXecution) format, before being executed on the GPU.
The action plan for today is to:
- Write a simple vector addition program in standard C — keeping it old school.
- Level up by re-writing the same program in CUDA C to harness the power of parallelism.
- Take it a step further: tweak our CUDA kernel so it can be loaded and executed seamlessly within PyTorch. This is where we make use of PyTorch C++ extension API.
- Finally, swap out the low-level CUDA code for Triton and use it with PyTorch.
Simple vector addition in standard C
You might want to brush up your skills on arrays and pointers because we are going to use it a lot moving forward.
Below is the python equivalent of the C code that we will be writing for vector addition. We define two arrays, iterate through each of their elements, add them and append the result to a third array:
ARRAY_LEN = 5

def vectAdd(a, b, c, arr_len):
    for i in range(arr_len):
        c.append(a[i] + b[i])

def main():
    # define two lists/vectors
    vectA = [1, 2, 3, 4, 5]
    vectB = [4, 5, 3, 3, 5]
    # outputs are appended here
    vectC = []

    # loop through each item, add them and append to vectC
    vectAdd(vectA, vectB, vectC, ARRAY_LEN)

    # print the vector addition result
    print(vectC)


if __name__ == "__main__":
    main()
Here is the equivalent C code for vector addition (save the code in vectAdd.c):
#include <stdio.h>

#define ARRAY_LEN 5


// takes in 3 arrays and the number of elements in the array
void vectAdd(int *a, int *b, int *c, int len) {
    // loop through each item in `a` and `b`,
    // add them and append to `c`
    for(int i=0; i<len; i++) {
        c[i] = a[i] + b[i];
    }
}

int main() {

    // define two arrays/vectors of length `ARRAY_LEN`
    int vectA[ARRAY_LEN] = {1, 2, 3, 4, 5};
    int vectB[ARRAY_LEN] = {4, 5, 3, 3, 5};
    // outputs are appended here
    int vectC[ARRAY_LEN];

    // loop through each item, add them and append to `vectC`
    vectAdd(vectA, vectB, vectC, ARRAY_LEN);

    // print the vector addition result
    for(int i=0; i<ARRAY_LEN; i++) {
        printf("%d\n", vectC[i]);
    }

    return 0;
}
For those who are wondering, we cannot directly print an array in C as we do in python. So to print the final result of vector addition, we will
have to iterate through each element in vectC, and print them one after the other.
You can compile the C code using gcc which comes built-in with most of the linux distros. Just run gcc vecAdd.c -o vecAdd.out which will create an executable
called vecAdd.out. You can then run ./vecAdd.out to get the result of vector addition.
Diving into CUDA
A quick refresher on CUDA basics
Now we will take it a step further and parallelize the vector addition program using CUDA. But before that we will do a quick walk through of CUDA basics. If you feel like digging into the details of anything discussed here, you can always checkout the CUDA refresher series from NVIDIA.
Since we are dealing with vector addition, consider the example of two vectors A = [1, 2, 3, 4, 5], B = [4, 5, 3, 3, 5], and an empty placeholder vector C = [] for storing the result of vector addition. Earlier in standard C, we iterated over each element sequentially and added them. But now we have the power of parallelism since we are running our vector addition on a GPU.
This is how we could parallelize vector addition of A and B using the power of threads in GPU:
- Let’s start 5 threads for now since we have 5 items in
AandB. Each of these 5 thread will be executed in parallel on the GPU. - In our program , each thread will only execute one operation, and that is
A[i] + B[i]and store it inC[i]. - For the above step, assume that
iis the index of the thread, which will be 0 for the first thread, 1 for the second thread and so on.
Here’s the illustrated version of the above steps:
Input Vectors:
   A: [ 1   2   3   4   5 ]
   B: [ 4   5   3   3   5 ]

Threads (T0 - T4) execute in parallel:

   T0: C[0] = A[0] + B[0]  →  C[0] =  5
   T1: C[1] = A[1] + B[1]  →  C[1] =  7
   T2: C[2] = A[2] + B[2]  →  C[2] =  6
   T3: C[3] = A[3] + B[3]  →  C[3] =  7
   T4: C[4] = A[4] + B[4]  →  C[4] =  10

Result stored in output vector:
   C: [ 5   7  6  7  10 ]
Thus we have a conceptual view of how we could transform a sequential program to a parallel program.
Here are some technical details that you might want to know:
-
In a CUDA program, the CPU is called the host and GPU is called the device. To avoid confusions and bugs, variable names defined in the host are prepended with
h_and variables defined in the device are prepended withd_. For example the variableinpArraydefined in host should beh_inpArrayandinpArraydefined in device should bed_inpArray. -
The functions with
__host__qualifier or without any qualifier are executed on the host and functions with__device__qualifier are executed on the device. The functions with__global__qualifier are launched from the host and executed on the device with the specified number of threads. Usually GPU kernels are written with__global__qualifier.
// executed on the CPU
void randFunc1() {
    ...
}

// executed on the CPU
__host__ void randFunc2() {
    ...
}

// executed on the GPU
__device__ void randFunc3() {
    ...
}

// launched from the CPU  and executed on the GPU
// This is a GPU kernel
__global__ void randFunc4() {
    ...
}
-
This is the workflow of a CUDA program:
a. We define a kernel with
__global__qualifier.b. We define the input variables on the host memory.
c. We transfer the input variables from host to device memory.
d. We launch the kernel with the specified number of threads, along with the input variables.
e. We transfer the resulting output variables from device to host memory.
f. Free the device memory.
Earlier in our illustrated example, we refer to 5 threads with 5 index values. We need these values to perform the addition operation. But how do we get this value from inside a kernel? For this, we need to know how grids, blocks and threads are organized in the CUDA programming model. In the most simplest language, multiple threads are grouped together to form a block and multiple blocks are grouped together to form a grid.
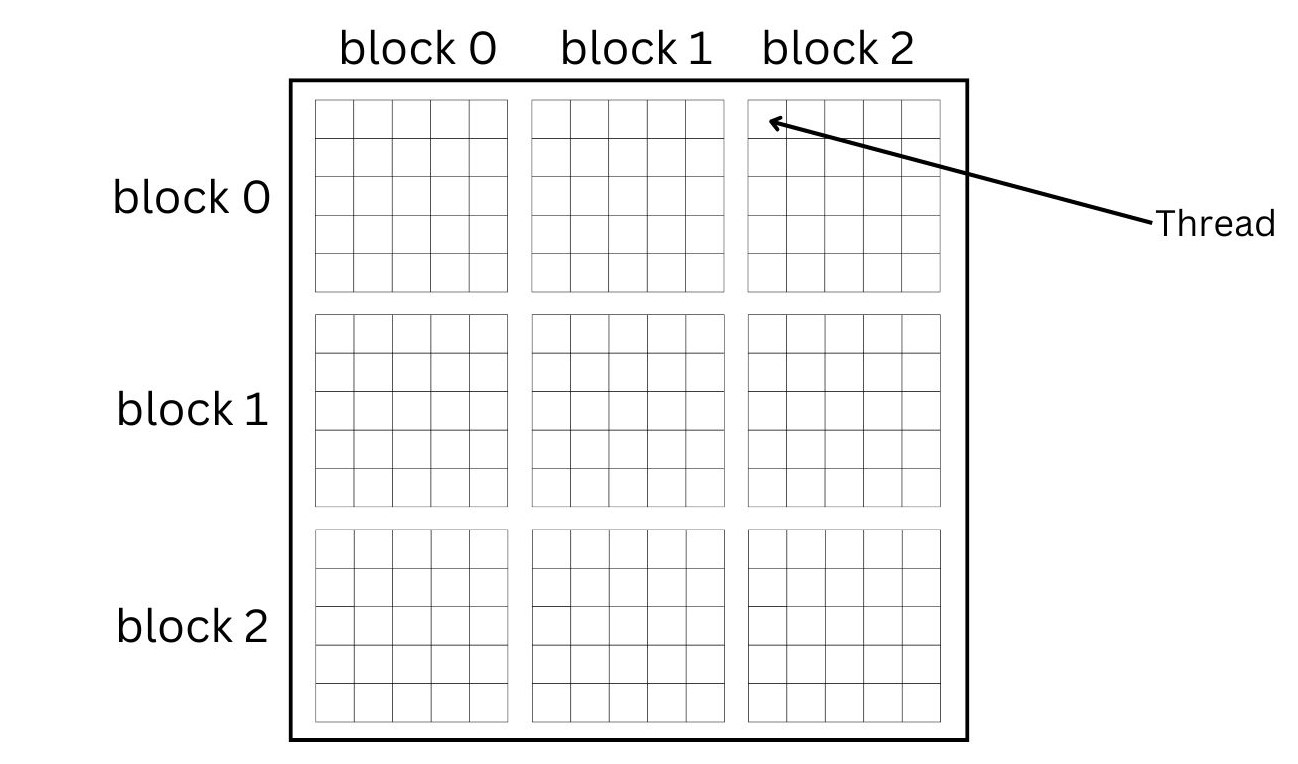 Figure 1: Organization of blocks and threads in CUDA programming model
In Figure 1, we have 3 blocks along X and Y directions. Each block has 5 threads along X and Y directions. This is the formula to calculate the index for our vector addition example:
$$ \text{index} = \text{blockIdx.x} \times \text{blockDim.x} + \text{threadIdx.x} $$
For the thread marked in the figure— the index of the block is 2 (along X), block dimension is 5 (there are 5 threads in a block) and the thread index is 0. So, index for the kernel can be calculated as:
$$ \text{index} = 2 \times 5 + 0 = 10 $$
Thus, this thread will compute the sum of 11th element (indexing starts from 0) of A and 11th element of B (we only have 5 elements here though) and store the result as the 11th element of C.
Rolling up your sleeves: Writing CUDA code for vector addition
Now we have the basics of how parallel programs are written. Let’s change our standard C code from earlier section to a CUDA kernel.
We’ll re-write the vectAdd function to run only the addition of one element inside it (save it in vectAdd.cu).:
#include <stdio.h>
#include <cuda.h>

// vector addition GPU kernel
__global__ void vectAdd(int *d_inpA, int *d_inpB, int *d_outC, int arrLen) {
    // we use this index to get the element from the array
    int idx = blockIdx.x * blockDim.x + threadIdx.x;

    // do computation only if the index is less than the array length
    if (idx < arrLen){
        d_outC[idx] = d_inpA[idx] + d_inpB[idx];
    }
}
The cuda.h header file has all the necessary definitions for the CUDA programming model. The __global__ qualifier, blockIdx.x, blockDim.x and threadIdx.x are all from this header file.
Each thread in the GPU will have a copy of the above kernel and will be executed in parallel. Now let’s complete our CUDA program by including the main() function from where we will launch the GPU kernel (save it in vectAdd.cu along with the GPU kernel):
#define ARRAY_LEN 5

int main() {

    // define the no. of blocks and threads
    // required for the kernel launch
    int nThreads = 5;
    int nBlocks = 1;

    // define the input and output vectors in host
    int h_vectA[ARRAY_LEN] = {1, 2, 3, 4, 5};
    int h_vectB[ARRAY_LEN] = {4, 5, 3, 3, 5};
    int h_vectC[ARRAY_LEN];

    // pointers to store the memory address of data in device
    int *d_vectA;
    int *d_vectB;
    int *d_vectC;

    // `int` occupies 4 bytes in memory, so `arrSize` will be 20 bytes
    int arrSize = sizeof(int) * ARRAY_LEN;

    // allocate the memory in GPU for inputs and outputs
    cudaMalloc((void**) &d_vectA, arrSize);
    cudaMalloc((void**) &d_vectB, arrSize);
    cudaMalloc((void**) &d_vectC, arrSize);

    // copy the data from host to device
    cudaMemcpy(d_vectA, h_vectA, arrSize, cudaMemcpyHostToDevice);
    cudaMemcpy(d_vectB, h_vectB, arrSize, cudaMemcpyHostToDevice);

    // launch the kernel
    vectAdd <<<nBlocks, nThreads>>>(d_vectA, d_vectB, d_vectC, ARRAY_LEN);

    // copy the output data from device to host
    cudaMemcpy(h_vectC, d_vectC, arrSize, cudaMemcpyDeviceToHost);

    // free the memory allocated in device
    cudaFree(d_vectA);
    cudaFree(d_vectB);
    cudaFree(d_vectC);

    // print the vector addition result
    for(int i=0; i<ARRAY_LEN; i++) {
        printf("%d\n", h_vectC[i]);
    }

    return 0;
}
The CUDA code above can be compiled and executed using NVCC (Nvidia CUDA Compiler) using the command nvcc vectAdd.cu -o vectAdd.out && ./vectAdd.out.
Here are some extra notes that might explain the GPU code better:
- We define three pointers,
d_vectA,d_vectBandd_vectC. If we print these pointers before callingcudaMalloc, the values will be(nil). After runningcudaMalloc((void**) &d_vectA, arrSize), the value ofd_vectAwill be a memory address. Under the hoodcudaMallocallocated memory in the GPU of sizearrSizeand assigned this address as the value ofd_vectA. Let’s confirm this by printing out stuff from the original main function:
int main() {
    ...

    // `int` occupies 4 bytes in memory, so `arrSize` will be 20 bytes in memory
    int arrSize = sizeof(int) * ARRAY_LEN;

    printf("Before memory allocation:\n");
    printf("Address stored in `d_vectA`: %p\n", d_vectA);
    printf("Address stored in `d_vectB`: %p\n", d_vectB);
    printf("Address stored in `d_vectC`: %p\n", d_vectC);

    // allocate the memory in GPU for inputs and outputs
    cudaMalloc((void**) &d_vectA, arrSize);
    cudaMalloc((void**) &d_vectB, arrSize);
    cudaMalloc((void**) &d_vectC, arrSize);

    printf("After memory allocation:\n");
    printf("Address stored in `d_vectA`: %p\n", d_vectA);
    printf("Address stored in `d_vectB`: %p\n", d_vectB);
    printf("Address stored in `d_vectC`: %p\n", d_vectC);

    ...
    return 0;
}

///////////////////// OUTPUT /////////////////////

/*
    This is a sample output from running the
    above print statements (the exact memory address may vary):

    Before memory allocation:
    Address stored in the pointer `d_vectA`: (nil)
    Address stored in the pointer `d_vectB`: (nil)
    Address stored in the pointer `d_vectC`: (nil)

    After memory allocation:
    Address stored in the pointer `d_vectA`: 0x502c00000
    Address stored in the pointer `d_vectB`: 0x502c00200
    Address stored in the pointer `d_vectC`: 0x502c00400
*/
-
cudaMemcpywithcudaMemcpyHostToDeviceas argument copies the data from host to device, whereascudaMemcpywithcudaMemcpyDeviceToHostas argument copies the data from device to host. -
Launching a GPU kernel is as simple as calling
kernelName <<<nBlocks, nThreads>>> (args);. In our case, it isvectAdd <<<nBlocks, nThreads>>> (d_vectA, d_vectB, d_vectC, ARRAY_LEN); -
After the kernel execution is over and the results are copied from device to host, we call
cudaFreeto free the device memory allocated ford_vectA,d_vectBandd_vectC.
Using PyTorch C++ extension API to load CUDA kernels
I used Google Colab for this part to skip messing up with dependency installation issues. If you are on Google Colab with GPU, run sudo apt install ninja-build and restart the session before running any code.
We are going to use torch.utils.cpp_extension.load_inline to load the CUDA kernel from PyTorch python API.
On a high level, this is how are going to load the cuda kernel with PyTorch:
import torch
from torch.utils.cpp_extension import load_inline

cuda_src = # some cuda code
cpp_src = # some c++ code

# load the low-level CUDA and C++ code
module = load_inline(
    name="vectAdd",
    cuda_sources=[cuda_src],
    cpp_sources=[cpp_src],
    functions=["vect_add"],
    with_cuda=True,
    # nvcc compiler flag for optimization level
    extra_cuda_cflags=["-O2"],
)

# input tensors for vector addition
x = torch.tensor([1, 2, 3, 4], dtype=torch.int, device="cuda")
y = torch.tensor([1, 2, 6, 4], dtype=torch.int, device="cuda")

# call the vector addition function
res = module.vect_add(x, y)
print(res)

## Output: tensor([2, 4, 9, 8], device='cuda:0', dtype=torch.int32)
The only part left to fill in are the cuda_src and cpp_src. Let’s do that now.
This is the cpp_src for us:
cpp_src = "torch::Tensor vect_add(torch::Tensor x, torch::Tensor y);"
We declare the C++ function vect_add that takes in two tensors as input. Think of it as the template for the function that we are going to define inside cuda_src. The API for torch in C++ is almost similar to python, mostly the dot notations like torch.Tensor are replaced with torch::Tensor. We will see more of this when we define our function in cuda_src below.
We will save the code for cuda_src in the file vectAddTorch.cu and then use pathlib’s read_text() function to read it as a string.
This is the cuda_src for us (save this in vectAddTorch.cu):
// GPU kernel
__global__ void vectAddKernel(int *a, int *b, int *c, int len) {
    int idx = blockIdx.x * blockDim.x + threadIdx.x;

    if (idx < len) {
        c[idx] = a[idx] + b[idx];
    }
}

// define the C++ function declared in `cpp_src`
torch::Tensor vect_add(torch::Tensor x, torch::Tensor y) {
    // get the number of elements in the tensor
    int size = x.numel();

    // no. of threads & blocks for launching the kernel
    int n_threads = 5;
    int n_blocks = 1;

    // create an empty tensor to store the results of
    // vector addition
    torch::Tensor out = torch::empty_like(x);

    // launch the vector addition kernel
    // pass the pointer to `x`, `y` and `out` along with the size
    vectAddKernel <<<n_blocks, n_threads>>> (x.data_ptr<int>(), y.data_ptr<int>(), out.data_ptr<int>(), size);

    // return the result
    return out;
}
So instead of the main() function from the previous iteration, we now use the power of PyTorch’s C++ API to define a function vect_add that takes in pytorch tensors and launches the vector addition GPU kernel and returns the result as a PyTorch tensor.
Let’s now complete our python code to load the CUDA kernel (save this in vectAddTorch.py):
from pathlib import Path

import torch
from torch.utils.cpp_extension import load_inline

# added the `cuda_src` and `cpp_src`
cuda_src = Path("vectAddTorch.cu").read_text()
cpp_src = "torch::Tensor vect_add(torch::Tensor x, torch::Tensor y);"

# load the low-level CUDA and C++ code
module = load_inline(
    name="vectAdd",
    cuda_sources=[cuda_src],
    cpp_sources=[cpp_src],
    functions=["vect_add"],
    with_cuda=True,
    # nvcc compiler flag for optimization level
    extra_cuda_cflags=["-O2"],
)

# input tensors for vector addition
x = torch.tensor([1, 2, 3, 4], dtype=torch.int, device="cuda")
y = torch.tensor([1, 2, 6, 4], dtype=torch.int, device="cuda")

# vector addition function
res = module.vect_add(x, y)
print(res)

## Output: tensor([2, 4, 9, 8], device='cuda:0', dtype=torch.int32)
Replacing low-level CUDA code with Triton
This part will be a lot more easier since we already know the CUDA programming model. We will define a triton kernel using a python like syntax and use it directly from PyTorch without us having to bother about the low-level CUDA code.
Every triton kernel is decorated with triton.jit decorator. This compiles the function just-in-time using the triton compiler. But we
don’t have to worry about this for now, we just decorate our kernel with triton.jit and the rest is handled by triton.
Triton abstracts away the concept of threads, thus, triton functions are executed on a block of data rather than on a single element. Here is an illustration of how triton works when we launch a vector addition kernel with only two blocks:
Input Vectors:
   A: [ 1   2   3   4 ]
   B: [ 4   5   3   3 ]

Blocks (B1 - B2) execute in parallel:

   B1: C[0: 2] = A[0: 2] + B[0: 2]  →  C[0: 2] =  [ 5   7 ]
   B2: C[2: 4] = A[2: 4] + B[2: 4]  →  C[2: 4] =  [ 6   7 ]

Result stored in output vector:
   C: [ 5   7  6  7 ]
Let’s assume that we would like to do a vector addition of two tensors with 4 elements each. The triton kernel
can be written as follows (save it in vectAddTriton.py):
import os
import triton
import triton.language as tl

# env variable for debugging triton
os.environ["TRITON_INTERPRET"] = "1"

# triton kernel for vector addition
@triton.jit
def vect_add_kernel(
    x_ptr,
    y_ptr,
    out_ptr,
    BLOCK_SIZE: tl.constexpr,
    num_elements: int,
):
    # get the program id, similar to `idx` in CUDA kernel
    pid = tl.program_id(axis=0)

    # get the start and end of the block
    block_start = pid * BLOCK_SIZE
    offset = block_start + tl.arange(0, BLOCK_SIZE)
    # we don't do any computation on indices where mask is false
    mask = offset < num_elements

    # load the input tensors as a block
    x = tl.load(x_ptr + offset, mask=mask)
    y = tl.load(y_ptr + offset, mask=mask)
    print(x, y)

    # vector addition on the loaded block of data
    output = x + y
    # store the output
    tl.store(out_ptr + offset, output, mask=mask)
If we were to launch the above kernel with two vectors x = [1, 2, 3, 4] and y = [5, 6, 7, 8], BLOCK_SIZE=2 and the number of blocks as 3.
Each of the 3 blocks will get 2 elements to run the vector addition. If we print the pid, block_start, offset, mask and data blocks while running the kernel,
it will be as follows:
### BLOCK_SIZE = 2
### NUM_BLOCKS = 3
### x = [1, 2, 3, 4]
### y = [5, 6, 7, 8]

PID: [0]
Block start: [0]          # pid * BLOCK_SIZE
Offset: [0 1]             # block_start + tl.arange(0, BLOCK_SIZE)
Mask: [ True  True]       # offset < num_elements
Data block from x: [1 2]
Data block from y: [5 6]
Output block: [6 8]

PID: [1]
Block start: [2]
Offset: [2 3]
Mask: [ True  True]
Data block from x: [3 4]
Data block from y: [7 8]
Output block: [10 12]

PID: [2]
Block start: [4]
Offset: [4 5]
Mask: [False False]
Data block from x: [0 0]
Data block from y: [0 0]
Output block: [0 0]
Finally, let’s add in the function that passes the input tensors and launch the kernel
(save it in vectAddTriton.py):
import torch

DEVICE = "cuda:0"
BLOCK_SIZE = 2

def add(x: torch.Tensor, y: torch.Tensor):
    assert x.device == y.device == torch.device(DEVICE)

    # output of vector addition is stored here
    output = torch.empty_like(x)
    # launch the kernel with 3 blocks along X axis
    # (only along X axis because we are dealing with 1D tensor here)
    vect_add_kernel[(3,)](x, y, output, BLOCK_SIZE, num_elements=x.numel())

    return output

if __name__ == "__main__":

    x = torch.tensor([1, 2, 3, 4], device=DEVICE)
    y = torch.tensor([5, 6, 7, 8], device=DEVICE)

    res = add(x, y)
    print(res)

## Output: tensor([ 6,  8, 10, 12], device='cuda:0')
We can run the the above code including the triton kernel as a normal python script. Setting the environment variable
"TRITON_INTERPRET" allows us to print stuff and set breakpoints while running the triton kernel. You can read more about debugging triton kernels here.
We finally made it to the end of this post after going through a whole lot of C, CUDA, C++ and Triton. This was just a glimpse of the huge GPU programming landscape. I’ve deliberately left the kernel profiling and benchmarking steps, this can be considered as a potential next step for the readers.
All the code used in this post can found here.
Useful resources
[1] “Gpu-Mode/Lectures: Material for Gpu-Mode Lectures”. GitHub. 2025.
[2] “Vector Addition — Triton Documentation”. Triton-Lang.org. 2020.